
Replacing Windows & Hatches – Frames
Window template
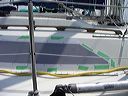
Masked window
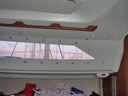
Interior showing studs

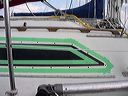
Finished job
Window close-up
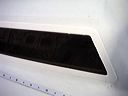
Alloy frames on a 34
Alloy frames to cure leaky windows
"My frames were made and painted by Bristol Marine in Port Credit, Ontario, and I installed them myself. Bristol's charges were for: parts $136, welding – 8 hours @ $92/hr, painting – 2 hours @ $80/hr, giving a total project price of $1,032 before taxes. The frames were made from aluminum stock, bevelled and rounded, and with aluminum 1⁄4"x20 studs welded on the inside. They were painted with 2-part Awlgrip. There are no fasteners visible on the outside. I used a tube of "Innotec" white caulking, which cost $24. Nuts and washers (22 per side) cost a few more dollars. I also had to buy 44 3/4" plastic plugs to cover the holes inside.
"Once the frames were ready, I made templates out of mylar drafting sheets for both port and starboard frames, carefully marking the stud positions in order to drill holes in the cabin in the proper locations. I marked the hole locations on the Mylar and punched them with a hand-held ring-binder punch. Getting these holes in the right place was a critical step, since there is no way to get 22 rigidly fixed studs into 22 holes unless they are positioned accurately. As it was, I had to enlarge some of the holes slightly to get the frames to go on. I then taped the templates to each side of the cabin, and drilled the holes from the outside. I also enlarged the holes where they passed through the cabin liner to allow for the washers and nuts.
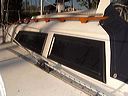
"I then dry fit the frames and masked them on both the outer (fibreglass) side and the inner (plexiglas) side.
"The next step was to caulk and install the frames. Even though I masked the frames carefully, the caulking lines never became as smooth as I wanted. Trimming with a sharp blade later helped this a bit.
"The next picture shows the inside cabin before installing the cosmetic plastic hole covers.I have cleaned up the caulking lines a bit since taking these pictures.
"Before installing the plastic plug hole covers on the inside, I had to cut off excess length on some of the aluminum studs. It seems the thickness of the cabin side varies a bit in different places.
"If I had to do this project over again, I would have new plexiglass made. After many rain storms, I have no more window leaks!
"One advantage of this approach was that it was a one-man project. I don't think my wife or friends would have had the patience to help me through a project longer than a couple of hours.
"In spite of how it may look, this approach does not reduce the clear area of the windows. The inside flange that the Plexiglas is originally glued to reduces the clear area more than the new frames do."
– Bob England, Heatwave, C&C 27 Mk V