This Forum is supported by C&C 27 owners like you whose membership in the C&C 27 Association makes possible this Forum and the accompanying site. Thank you, members, for your continuing commitment.
You are not logged in.
Pages: 1
Just closed the deal on my C&C MKV. I plan on racing with crew and also single-handed.
right now all halyards and reefing pendants (2) are led back to rope clutches.
It looks like there's potential for big spagetti in the cockpit.
The old rope clutches are old, aren't very easy to use and don't inspire much confidence. I plan on replacing the eight clutches in the spring.
How do the fast guys set up their decks?
On Distant Thunder we have a new main, with only one reef point. So we lead the reef line, main halyard and spinniker halyard to the starboard line clutches, and two genny halyards to the port side line clutches, along with the outhaul. The vang cleats on its own tackle, and we keep the cunningham led on its own tackle on the mast.
The spinnaker pole uphaul and down haul are led to a pair of cleats on the starboard side of the cabin.
We toss all the loose ends down the companionway while racing - we've never had problems with that arrangement, and nothing gets snarled.
I replaced all of the halyards with spectra line when I bought the boat, since the original dacron halyards stretched like crazy. I still have the original line clutches, which work fine. I give them a shot of teflon spray twice a year to keep them from binding.
My backstay adjustment cleats on its own tackle on one corner of the stern - some boats lead it double ended to each side of the cockpit next to the traveller - a nice arrangement, but I have never got around to it.
Make sure you like your traveller arrangement, and that it is easy to play while going to winward in a breeze.
Jim
Distant Thunder
Hull #69
Offline
Hi Jim,
My traveller arrangement is pretty sticky and a pain to adjust - any recommendations on sorting the traveller?
Hi
I have seen several arrangements for the traveller. Some have different cleats, some have an extra purchase (which is nice in heavy air, but then there is more line to pull)
Mine is the original Holt traveller - I have replaced the bearings - not because I wanted to, but because I failed to cleat it on a heavy air gybe, and it blew the end cap off, and the car came off. Bearings flew like shot gun pellets!
So: if it is sticky or jamming, you can remove one end cap, and remove the car. You need a special little plastic gizmo that is like an extension of the track - you slide the car onto the gizmo, and that prevents the bearings from flying off and bouncing down the scuppers. The gizmo is available from any marine store - mine is from Genco. Inspect the bearings for wear, and replace if necessary. Or, if it looks like there rough spots in the raceway that is chewing up bearings , buy a new car. Mine was fine with just new bearings. While you are messing around, inspect the end caps on the track. If they are original they are probably hard and brittle. Replace them with new ones - just in case you forget to cleat it on a gybe!
My traveller line leads to cam cleats on the side of the cockpit - you need to be able to cleat & uncleat them with one hand while steering with the other, while sitting on the rail. - if your arrangement will not allow you to do that easily you may want to change it.
The nicest arrangement for the line is to have if spliced on to the shackles on the car - really nice is to make it continous.
Offline
Jim, it sounds like I have the same traveller arrangement as you on my boat. The night this past summer when the remnants of Hurricane Francis came though, I also had an accidental gybe that blew the track end cap off, and partially ripped out the end bolt. Fortunately, the car didn't come off and the bearings stayed put. I've been trying to get replacement end caps; they are on order at Mason's the Store, but no sign of them yet. Where did you get yours?
My traveller car was also very sticky/rough when I got the boat. I found that a good spray with dry teflon lubricant went a long way to smoothing it out. It's so easy to try that, I'd recomment it as a first step before replacing the bearings.
Bob, Heatwave
I think there have been a couple of different tracks put on the MK V.
Mine has the Shaefer track. I ended up ordering the replacement parts from <A href="http://www.schaefermarine.com/">http://www.schaefermarine.com/</A> as they were a lot cheaper than local suppliers.
Jim, thanks. I have a Harken traveller.
my mistake - mine is a Harken as well.
I picked up the end caps at Genco.
Jim
Distant Thunder
Offline
Hello,
I had a Trapper 500, which is a UK built C&C 27 MK I
I now have a Superseal 26 (Ron Holland design) which is somewhat similar to a MKV (based in Weymouth, Dorset, England)
Reefing
To cut down cockpit spaghetti I have made a simple modification to single line slab reefing with two reefs, which are necessary where I sail. (English Channel)
System.
Instead of a single line, use two lines per reef, one to the luff, one to the leach.
Advantage, they can be adjusted independently, the free ends are only double the drop of the sail, there is no need for blocks on the luff.
Now, the way to cut out miles of string in the cockpit.
Use four lengths of 4mm braid on braid, splice all four into two and a half metres of 12mm. The 4mm lines MUST be different colours (so you can tell them apart when fine-tuning settings while sailing). The 12mm is led through the turning blocks and though a rope clutch.
The lengths of the four 4mm tails are all different (according to the differing runs from the clutch to the reef points on the sail), and the overall assembly is sized so that the splice comes through the rope clutch by about 3" when the first reef is home.
To reef, do all the usual with kicker (vang), topping lift halyard etc. Pull in the 12mm tail until the reef is home, adjust the individual 4mms if necessary.
With this system there is now only 2 metres or so of 12mm in the cockpit and, the clever bit, all the slack is taken out of the second reefing lines.
To pull in the second reef, grab the two lines for the second reef and pull home. Adjust if necessary.
Needs the sort of rope clutch that does not open when the line is tightened, and will lock 4 x 4mm lines. So far I have used a Barton satisfactorily.
Because the ends of these two are spliced into the 12mm, they lie in a loop of about one metre over the 12mm
Result, easily set reefs, adjustable and minimum string in cockpit.
I call this Double Divided line reefing.
If this is not clear or pictures required email <A href="mailto:fdmarsden@aol.com">fdmarsden@aol.com</A>
Frank Marsden
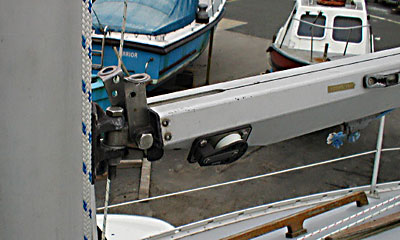
Addendum:
This photo shows necessary guides and anchors added to gooseneck. Without these, sail will collapse down onto deck and it is impossible to get the luff tension. The block on the boom leads the leach line direct from the deck turning block through a bullseye to the adjustable block at the leach.
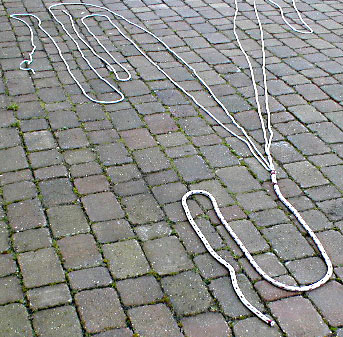
The other shows the 12mm into 4 x 4mm splice. It is necessary to seize them together as I have not yet found a way to make a true splice. About 6" of the core of the 12mm is removed.
The next thing I want to try is 12mm to 2 x4mm and 1 x 8mm and then 1 x 8mm into 2 x 4mm, Sucess of this depends upon the turning blocks. At present I run two 2 x 4mm pairs through a twin sheave block at deck level.
Last edited by (2004-11-25 00:32:49)
Pages: 1