
A New Rudder
Towser's rudder was examined as part of her five-year insurance survey, found to be delaminated over a substantial area and deemed questionable. Accordingly it was removed in the late fall of 2008. Here's what happened then.
You can find other information on rudders in Mk III Rudder and Hyperion's New Rudder.
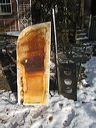
Initial cutting
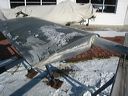
Serious splitting
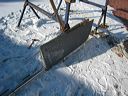
Apart at last
Measurements
Web, stock and shell
New rudder
The Tale of the Rudder
Phil's Foils, now Competition Composites, in Ottawa, is highly regarded for the quality of their work. Phil, a telecom engineer turned foil-maker, uses a CNC cutter to deliver very accurately formed foils to a high state of finish. A deal was struck whereby I would remove the rudder and strip it down to the shaft and web, which would be the basis for the new foil.
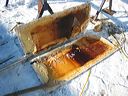
Removal of a tiller-steered rudder is easy; take off the tiller, draw the two bolts that hold the upper pivot and it slides out. "Easy" is not the word for splitting the rudder. Using a grinder and cutting wheel, I cut deep into the centreline of the foil, then inserted a chisel and crowbar. This effort, on a rudder in danger of falling apart, went totally unrewarded save the destruction of the chisel. Eventually, I found a sledgehammer and a splitting maul (a sledgehammer with an axe blade on one side); with these I was able to separate the shells with some difficulty. Interestingly, I found a layer of ice between the foam and the fibreglass shell, the mechanism for delamination. Water seems to have seeped into the rudder rather than flooded it, as there were clear 'waterlines' within the shell, indicating that water had achieved different levels from one year to another. Once the shaft and web were pried from the foam, I cleaned up the metal with a wire wheel.
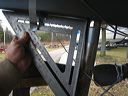
Later, I remounted the shaft on the boat and took a number of measurements, verifying that the shaft is square to the bottom of the hull, the precise position of the rudder on the shaft, etc. I then sent the shaft off to Ottawa.
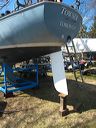
With the arrival of spring, I slid the new rudder into the rudder tube. So far, so good. But when I attempted to attach the upper bearing, no go. Measurement showed that the holes for the two bolts were precisely 1/4" of an inch too low. To put it another way, the rudder had been moulded 1/4" too high up the shaft, leaving too little metal inside the tube. Despair!
The obvious solution was to send it back to Phil's Foils and tell them to fix it. I discussed it, however, with a friend who is a mechanic and he took the mechanic's tack: the easy fix is simply to move the bolt holes and the tiller-bolt tube I had had welded into the shaft. This is the easy way? It is if your friend has a friend who makes his living welding jet engine blades, an artist with welding and machine tools. Fortunately the shaft was long enough to give room for this option. The old holes were filled and the new made, with a fit that astonishingly precisely compensated for a slight error in the original drilling of the upper bearing's holes.
With fit out of the way, I could coat the new blade with Interprotect barrier coat, mount it, paint it and launch. Performance underway seems fine, perceptively little different from the old rudder under sail, but under power, there is less vibration in the tiller and less pull to port, so clearly there is a fairly significant difference, probably in the symmetry of the foil.
Alternatives
Given the horrendous difficulty of splitting the old rudder, I have to question the necessity of replacing it. Having seen the very localized way water and ice had separated the foam and shell, I would now do this:
- Remove the rudder from the boat, and drill a series of largish (at least 1/2") holes along the line of maximum chord depth (along the line of maximum thickness). The holes should just touch the foam; ideally you would be able to see the foam/shell gap. Tuck the rudder away in the basement to dry out for the winter. If you live in one of those places where 'winter' means the temperature drops to a bitter, bone-chilling 25 degrees C for a couple of months, you might just want to leave the rudder out in the sun for a bit.
- Come spring, position it with shaft and blade dead level.
- Dry-fit clamps (given the size of the rudder, this could be a Rube-Goldbergy assemblage of clamps, shims and 2x4's or it could be large bags of sand) so the gap between the foam and shell is just closed.
- Working one side at a time, fill the holes with West System epoxy, then once the epoxy has had a chance to percolate through the void, gently and evenly clamp or weight the shell. Given what I saw, it's unlikely that there would be a path for epoxy from one side to the other, but to be safe, you might drill and repair one side before drilling the other. If for some reason, you do have to drill both sides together, block the lower-side holes. The only material I've found that is epoxy-proof is packing tape (duct and masking tape always come off). Protect your clamping material with cling film or plastic bags so they won't be stuck to the rudder; a dropcloth underneath will minimize cleanup of what will likely be a very messy job. Once one side is filled and faired level, flip and start over.
Obviously, I've not done this, but based on what I saw about the way the rudder was constructed and the way it had delaminated, I think it would work. If anyone has any additional thoughts, please .