
Hyperion's New Rudder
"On the night of Sept. 28, 2003, the Dartmouth Yacht Club in Dartmouth N.S. was visited by Hurricane Juan..." These pages describe the construction of a replacement rudder for 27 Mk I Hyperion by her owner, Ralph Ainslie. More on Juan, Hyperion and the effects of Juan can be found in 27 Tales. More on the MkIII rudder (which Ralph's rudder emulates) can be found under Mark III rudder. You may also be interested in A New Rudder.

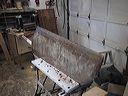
Original rudder
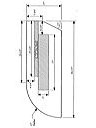
Working drawing
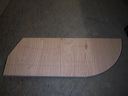
Shaped plywood
Laminated
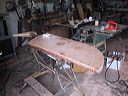
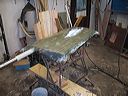
Taking shape

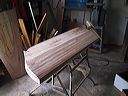
Ready to glass
First layers
Edge finish
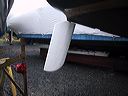
Installed

Installed 2
Building Hyperion's New Rudder
"I looked for someone to manufacture a new rudder, and this is where I ran into trouble. I couldn't find a company who had the design criteria to make one except for a Mk III. [This has since been rectified - see the Links & Contacts page for a supplier.]
"At this point I found your website and as a guest posted my question about rudders. I also sent my cheque to join the same day. I would like to thank everyone for all the input. It has been a great help.
"As for the design, I looked at the Mk III rudder and it didn't seem to fit the Mk I hull, so I used the measurements for the Mk III posted on the website but made the rudder look like a Mk I. Basically I narrowed it and made it longer so it still gives me about the same area in the water.
"According to a marine engineer friend of mine, the sharper the leading edge, the less pressure is created to make the rudder want to oversteer. We checked mine and I am right on the edge. If anyone is going to use my design I would suggest moving the shaft ahead about 2". This would solve the problem.
"For anybody who reads this, by the way, I put too much of the rudder ahead of the post. I was trying to have it match the hull. I will have to wait till the spring to see if this has any adverse effects, such as oversteering.
"On the plus side, when in reverse the longer narrower rudder should have less tendency to rip the tiller out of my hands and when going upwind I may not need two hands on the tiller to stop it from rounding up.
Material used for the construction:
1 pc. 1 1/2" sch. 80 316 stainless steel seamless pipe 48" long
1 sheet 5/8" marine plywood
1 qt. 2-part marine epoxy
Fibreglass to taste.
"New shaft – I am fortunate to be part-owner in a company with a machine shop. The top 22" of the shaft was machined to 1.8765", and the new holes were drilled and tapped using the original shaft as a guide. I used a piece of 5/16" stainless steel plate for the support.
"Cutting to shape – Five pieces were cut to make the rudder for a total thickness of 3 1/8".
"One piece was cut for the shaft and the section for the support was routed out to a depth of 7/16". This was to centre the piece on the shaft. The void left on top was filled in with scrap wood 1/8" thick and epoxied when we started to assemble the rudder. Two pieces just had the shaft opening cut. When assembled, these 3 pieces were the same thickness as the shaft, so the last two pieces formed the outer cover.
"Laminating – All wood was laminated using marine 2-part epoxy. We stood the rudder up and poured epoxy into the gaps around the shaft until there was no air left. A wood plug in the bottom of the shaft prevented the epoxy from coming up the inside.
"We have a problem here with water getting into the rudders then freezing. A lot of guys drill a small hole in the bottom in the fall, let the rudder drain and dry out, then fill the hole next spring. This is why I stressed filling in all the gaps with epoxy.
"Shaping the foil – The rudder was contoured with a hand-held power planer. This saved a mountain of work as the shaping still took approx. 2 1/2 hours.
"Fibreglassing – 2 layers of heavy woven fibreglass were laid up on the rudder and trimmed. One layer of 6 oz. fine woven fibreglass was laid up as the final layer and trimmed. The edges and top were finished with the 6 oz. fine cloth.
"Finishing – After sanding, the rudder was hung up and 2 layers of gelcoat were applied to finish the project. The finish was very hard and I was getting a little impatient. I didn't spend as much time sanding the finished product as I should have."
– Ralph Ainslie, Hyperion
"PS I'm taking the rudder back in and correcting that leading edge. It makes me a little nervous thinking of spending the whole summer fighting the tiller." [Installed 2, above, shows the result.]